 SANS10400-Building Regulations South Africa SANS10400 are the Building regulations in South Africa, and both international and national standards, are fundamental to successful building and construction projects, both big and small.
How to Change a Tap Mixer Cartridge, Step-by-Step
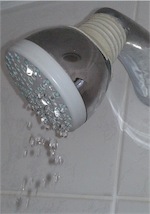
Tap mixer cartridges have changed the way home handymen tackle the task of fixing leaking taps and shower heads. The days of fixing a leaking tap by changing a simple washer are fast fading as more and more new mixer designs are manufactured. This is because of new technology that has been invented to ensure your hot and cold water is properly balanced and won’t scald you or burst out in a sudden splash of icy water.
Tap mixers are found in all utility rooms of the house today, from kitchens and bathrooms to small shower rooms and laundries; wherever you have a shower, basin or bidet, chances are there will be a tap mixer.
Some of the well-known brands available are HansGrohe, Franke, Tivoli, Cobra and Isca, to name but a few. These companies all produce mixers that use a cartridge rather than your classic tap washer. If you are not sure of what model or make your tap mixer is then do what I did, I took a picture with my mobile phone and showed it to the guy at the plumbing supplies shop. Hey Presto! He knew immediately the make and model and gave me the correct cartridge.
>
To replace the old tap mixer cartridge with a new one is fairly simple;
just follow the steps shown here:
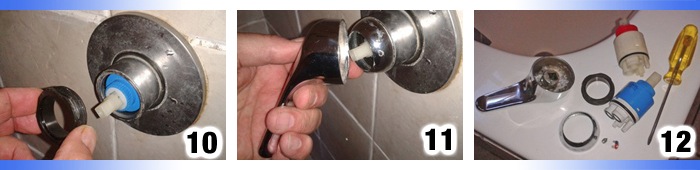
Step-by-Step Instructions to Change a Tap Mixer Cartridge
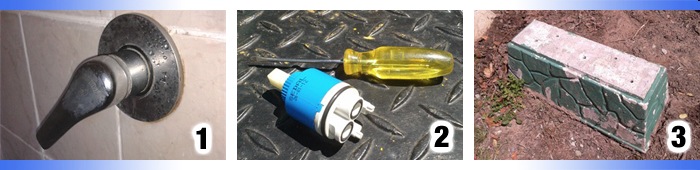
1. This is a standard shower tap mixer that uses a cartridge rather than a tap washer.
2. All you will need to do the job: a small to medium size screwdriver and of course the new replacement part. Make sure it is the right make and model for your tap mixer before you start as there are some variations between the different types.
3. It is most IMPORTANT that the first thing that do is shut off the mains water supply to your house. Mine is located under an upturned planter near the front gate.
4. This tap or faucet is outside in all weather and is usually only used in emergencies, so it may be a bit tight to turn off, Make sure it is properly turned off before you start work.
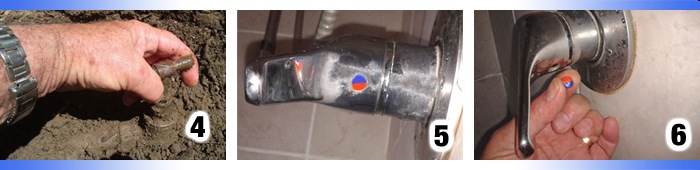
5. Now go to your tap mixer. You will find a small cap located underneath it. This is usually ceramic but may be plastic. The one pictured here is coloured red and blue.
6. Use your screwdriver to prise/lever the cap out. It won’t be difficult as it is only clipped in.
7. Inside the hole you will find a retaining screw. Loosen this until it turns freely. There is no need to take it out completely.
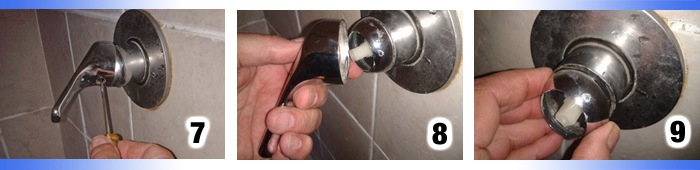
8. Now the handle should be free and you will be able to slide it off the cartridge pin. This might take a bit of effort as the square pin that goes into the handle can be a bit tight.
9. Next unscrew the metal housing that covers the retaining bush.
10. Most bushes today are made of plastic, so they should be fairly easy to remove.
11. All you have to do now is to slide out the old one and put the new one back in it’s place. Then just follow these steps in reverse order, and you are done.
12. This is a shot of all the components and parts, old and new that I used to replace the tap mixer cartridge in our shower.
So next time your tap mixer drips or leaks, don’t call in a plumber, DO IT YOURSELF!
>

The most obvious reason to replace a cartridge would be a leaking tap/mixer. You forgot to mention the most important procedure during replacement of a mixer cartridge: Cleanliness of the sealing surfaces (or the leak may be even worse after cartridge replacement !)
Once the old cartridge has been removed it will be time and effort well spent to ensure that all sealing surfaces are absolutely free from any form of dirt, before the new cartridge is inserted. It will help if a container could be filled beforehand to enable rinsing/flushing of the mixer body after clening to ensure all dirt particles have been effectively removed from the sealing surfaces.
Hi Johan, You are absolutely right. Thanks for pointing that out for us. 😀 It is essential to make sure that the contact areas for the seals are clean so that you do not have the leak all over again.
Hi there
I need your help. I cant seem to find the cartridge in your pictures. Thats exactly the one i need for my tap. Please let me know what brand it is or where i can get it. I am based in cape town
Hi Junaid, I bought mine from OnTap and the invoice description is: ICSA Cartridge for all p/t mix, the stock code is 9822. All plumbing outlets should have them. Hope this helps.
Great Post. Thank you very much.
how and where would I be able to get a cartridge 4 the cobra tap???
Contact Cobra directly and ask them for info about shops in your area that sell them.
Also do you know if it’s 35mm or 40mm
Your instructions are faultless! I have now done this several times, but still the water pours out where the cartridge goes in, even worse than the leak. The tap and cartridge are new. I have re-re-re-checked to see there is no debris in there. It’s as clean as a whistle. Could I have just been unlucky and got three dud cartridges? Don’t know what else to do except buy another new tap.
Hi Lin, Did you take the old cartridge to the hardware merchant when you purchased your newone so that you could be sure you got the correct one? Or somewhere you are either missing a part or installing incorrectly. Sorry I can’t be of more help, maybe ask your local hardware supplier to help.
I have an Isca Chloe sink mixer.Your instructions are great but I can not locate either a screw or Allan screw to loosen to get the handle off. I have tried to look into the hole using a torch but can not see anything.
Any suggestions as to how I can get the handle off?
Thanks
Hi Nick, The ICSA website has a drawing here: “ICSA-Products” I hope this helps, otherwise phone them, I am sure they will assist.
Check Youtube, especially if you have a swivel spout mixer. There are two rubber O rings inside that needs to be replaced. Unfortunately, Isca dealers are not selling them. Contact Isca where to find them. Remember to use a silicon based grease on the rings. Good luck. (Isca taps carry a 12 year warranty).
I have a Tivoli Caserta basin mixer. The swivel handle is very stiff and makes a noise when turning. It has been installed fot three years. What could the problem be.
You need to contact the manufacturer or supplier. This has absolutely nothing to do national building regulations.